Spring Cleaning for Normal People – eBook

If I didn’t know better I reckon that this would be a book written by wife …

spring cleaningI’ve been following the simplemom blog for a few months now. It has been a great source of information and tips and I have been forwarding some of the articles to my wife.

There have been quite a few good articles lately about keeping your house clutter free (which is something my wife strives for, and I struggle with). SimpleMom has put together an ebook with these good ideas for spring cleaning, plus more in it and is selling the book online for only $7.

The book consists of two different sections:

  • An essay about "stuff" and our consumer culture
  • A 10-part guide to spring cleaning, including
    • room by room checklists
    • inventory templates for printing
    • Daily game plans
    • Natural household cleaner recipes
    • and more

It’s a 68-page book and complements some of the other free charts and checklist are are downloadable for free from Simple Mom.

Replacing our Driveway

Large Step up from Driveway to Garage 
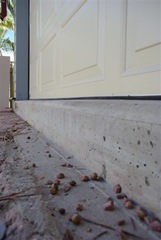
Up until now our garage has been virtually inaccessible because of the original old driveway. The original driveway is about 20cm (8 inches) below the garage entrance, which is rather difficult to navigate.

I had already tried to build a ramp out of timber, but that didn’t work very well as it had a very steep angle and moved around a lot. That left us with three options to get into our garage from our driveway:

  • Build a permanent concrete ramp from the existing driveway into the garage.
  • Replace the entire driveway with a new driveway.
  • Replace a portion of the driveway.

After looking at those three options we have decided to replace a portion of the driveway.

The portion that we have decided to replace is a large portion of the original driveway. We will be replacing all of the driveway inside of our property line. We probably would have looked at replacing the entire driveway with a new one, but that would have slowed us down a lot.

If we were to replace the driveway from the curb to the front of our property line it would have cost an extra $3000 or so. We would have also had to submitted plans to council, which would have most likely taken months to be approved.

In our area of West End in Townsville there has been significant road works this year. Most of the road works have been focused on improving the drainage in the area, and has included replacing the gutters. Our builder reckons that our road will have the gutters replaced in the next few years.

When the council replaces the gutters on the street they usually also replace the first metre or so of any driveways affected. When that happens we can always revisit the idea of replacing that final section that will be left of the original driveway.

Internal Stair Installation – Day 1 and 2

The First Day of our Stair InstallationThe first day of our stair installation saw the floor cut out of our old office area and the landing and lower stringers installed. They have also put the plasterboard over the gap between the ground floor and the first floor.

They were quite surprised at how well the walls all lined up. The only place really that they had some trouble was the back wall where the steam beam had been put up against the floor bearer. They have had to build out the plasterboard around that steam bearer to finish it off.

We managed to keep most of the mess out this time around with the taping that I did getting ready for the stairs to be installed. It made for an easier time when we got home from the day out, but we still had a bit to clean up.

Day 2 of the Stair Installation The second day of the stair installation saw the second run of stringers run up to the first floor. They have also built up the wall between the two sets of stairs.

As you can see in the photo the wall is built from the floor below right up to the top floor. It separates the two sets of stairs and will act as the banister for the top run of the staircase. The individual banister will then be attached to the new wall on the lower run of stairs.

Unfinished Hardwood Stair Treads We have also had the hardwood stair treads delivered and cut today.

The timber used for the treads is Kwila. We will be finishing the treads so that they look similar to the timber louvers in the stairwell. It’s a soft natural satin finish, rather than the traditional high gloss polyurethane finish.

We will be using hardwood decking boards on the landing between the two sets of stirs, so it should come up looking really good by the end of next week.

Getting Ready for our Stairs

Preparing for the new stairs - top floor We have emptied out our office area in anticipation of the stairs going in. Glenn was just here checking it out and he said they will be ready to start cutting out the floor tomorrow morning at 7:00 am. They will be cutting out the floor in the area and dropping it down below.

After the mess that we experienced when they had to cut out the bathroom floor we aren’t taking any chances this time around. I’ve already put up a plastic sheet over the area separating the stair area from the kitchen, and before we leave tomorrow morning I’ll be sheeting up the entrance between the dining room and stair area.

We have gone with an open tread design on the stairs, as the cost is about half that of an enclosed staircase.

The landing and stringers were delivered this morning and I’m just waiting for the treads to be delivered so that I can get started vanishing them. Hopefully starting next week we will actually be able to live upstairs and downstairs in our house!

It will feel pretty amazing to finally get to that point.