Build a Deck Safety Gate

Deck Safety Gate 
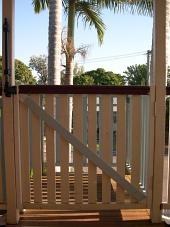
We added a deck safety gate to our front veranda to help keep the kids from falling down the stairs. The gate can also be locked for added security if desired.

I was lucky in that I had some railing left over from the old landing that was torn down when they lifted our house. I was able to cut that down to the width of the opening from our veranda to the new landing. On either side of the cut down railing I added a 2×4 and then added a diagonal support to help it maintain shape, since it would only be attached on one side.

Pool Gate Lock Attached to the Deck 
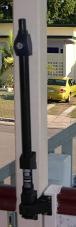
For the gate latch I used a pool gate lock, which was easy to install, and makes it hard for the kids to reach the latch top open the gate until they are older and taller.

The gate is a bit of pain to open if I don’t have a free hand to pull the latch, but I figure that the added safety outweighs that little bit of inconvenience.

Technorati Tags: ,,

Cheap and Easy Garage Storage Shelves

A few weekends ago I decided that we needed to add some extra storage in our garage. There are some fancy and expensive options available at Bunnings or places like Howards Storage World for storage and shelving solutions for the garage. Since I was after a simple shelf I figured that I should be able to do it for cheaper than what was on offer there.

In the end I built a 3.6m long shelf that is 44.5cm deep for only about $120.00. Other than the shopping time it only took about 2-hours to put it up, which was nice.

Garage Shelf Solution

The shelves consist of 2 x 1.8 metre long x 44.5cm wide x 14mm (I think…) melamine shelves and 6 x 40cm x 50cm galvanized brackets. Each bracket is anchored to a wall stud with 3 x screws, and then attached to the shelf with 4 x short screws.

The two 1.8m sections are also attached to each other using a 10cm x 40cm piece of timber screwed to each section at the bottom of the shelf to give it a bit more strength at the join. This should give it a bit more strength at what is probably the weakest point of the shelf.

I should be able to store about 30kg per metre, based on what I’ve read about the melamine and the brackets.

This shelving model is pretty easy to add to in 1.8m sections, and it can be very easily modified based on the size of wall being used and the depth of shelf needed.

Although the melamine already has  an edge on the front of it, I’m going to finish it off with a piece of 19mm x 38mm timber that was left over from the builders. I’m going to put that on the open side and along the front of the shelf. It should make it a bit more resistant to chipping than the melamine is, although I will have to paint or varnish the timber edge to give it a finished look.

Technorati Tags: ,,,

Taking a Week Off Work to Paint

I am taking this week off to paint under the house. The plastering is complete, so now it’s up to me to paint before the tiling in finished and the carpets are put in.

There are four bedrooms, a hallway, an ensuite and a toilet to prepare and paint in a week. In the middle of day two I have dusted off most of the walls and done all the caulking (no-more-gap) and puttying. Tamara’s Dad is helping again as right now he is sanding down the putty.

Tonight (second shift / day 2) I should be able to start sealing the plasterboard with the white primer.

I’ll try to give an update later in the week with how it’s going. I’ve got a bunch of mates coming hopefully on Friday to help, so that will help to get it done by the end of this weekend.

By the end of the weekend I will definitely need a bit of a break.

Technorati Tags:

Magnetic Insect Screens in Townsville

This week we replaced our Amplimesh Security Screen with a Magnetic Insect Screen. Here are some photos of the window. The first photo is with the Amplimesh Security Screen, and the second photo is our new MagicSeal Magnetic Insect Screen.

Amplimesh Steel Mesh Security Screen

MagicSeal Magnetic Insect Screen

The magnetic fly screen has made a huge difference in the dining room with greatly improved appearance, more natural light and increased air flow. Although it is not as secure as the previous security screen, it would take a very determined person to get 4 metres up the exterior wall to get into the house.

We had a fantastic experience in getting the Magnetic Insect Screens. From our first phone call to installation was less than a week! The company that did it was Freedom Retractable Screens. It’s run by a gentleman named Kevin who, with a partner in Cairns, covers North Queensland for retractable screens and magnetic insect screens.

The Magnetic Insect Screen cost us about $300 for three windows, which we felt was quite reasonable. For the three windows that we had the magnetic screen installed we paid the same as we did for one window with the Amplimesh Security Screen.

Here are the contact details for Freedom Retractable Screens:

Freedom Retractable Screens

Phone: 07 4775 4000
Mobile: 0438 136 945
Web: www.freedomscreens.com.au

You can read a bit about the MagicSeal magnetic insect screens on the Freedom Retractable Screen web-site here, and if you want more information then you can read about them at the MagicSeal website.

Technorati Tags: , , ,